A brief introduction to editing your webpages
This site uses a What You See Is What You Get (WYSIWYG) rich text editor that mimics some of the features found in programs such as Office Word, Pages, etc.
This manual is provided to help you navigate through the site and to edit pages using the editor.
The editor is optimized for usage in Safari, Chrome and Firefox. If you are experiencing difficulties with IE, please toggle compatibility mode.
**Please note. We do not recommend copying and pasting directly from another rich text editor into the editor.
How do I login/logout?
Go to Register
**You can change your password after logging in.
Once logged in, you will remain logged in until you either logout or you close your browser.
To logout go to /register/logout
How do I access pages to update?
Once logged in, navigate to the page you would like to edit:
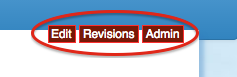
To edit a page, navigate to that page and look for the links labeled Edit and Revisions.
I'm using Internet Explorer and I do not see the editor!
If you only see html markup language in the text field labeled "content," then you might have compatibility mode activated. The following link discusses how to use compatibility mode in IE9. IE8 compatibility mode operates in a similar fashion.
If you are not sure which version of Internet Explorer you have, then press "Alt+H" and click on "About Internet Explorer"
How do I edit a page?
1. After logging in, navigate to the page that you would like to edit.
2. If the page is editable, then you should see a link about 1/3rd of the page down labeled "Edit". Click on this button.
3. This will open the editor. Please note that the section and description fields are usually empty.

4. Edit the page using the editor. *For advanced users, you can edit the html directly by clicking on 
5. We highly recommend creating your document in the editor and not in another word processor. If you do create the document in another word processor then please convert the document to a .txt file and do a copy from that document. You will lose all formatting and will need to reformat the document using the editor. This is why we recommend editing the document in the editor first. Please see "Why doesn't my page look like it did in Word (or another rich text editor)?" below to see what happens to when copying from a word document.
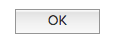
6. You must click on the button labeled "OK" before your changes will take effect.
What do all these buttons do?
 - Maximize Editor this will maximize your editor to the size of your browser window *** you must minimize the editor and click on OK before your changes will be saved.
 - Minimize Editor this will minimize/return the editor to the predetermined size
 - Find and Replace find a word or string of words within the text of Xinha to be replaced.
 - Style Editor add a predefined style (heading 1 -5, normal, address and formatted)
 - Font size control the size of the font by point
 - Bold
 - Italicize
 - Underline
 - Change the font color
 - Change font background color
 - Subscript
 - Superscript
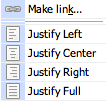
 - Left align-text
 - Center align-text
 - Right align-text
 - Justify text
 - Add an ordered list
 - Change format of ordered list
 - Add an unordered list
 - Add a horizontal rule
 - Insert a special character
 - Add an external link
 - Add an internal link
 - Add an image- Toggle HTML Source
 - Quick Tag Editor customize tags and attributes this is more of a tag builder that will allow you to build custom html without going directly to the source.
 - Edit html allows you to add custom html without going directly to the source.
 - Help provides information on keyboard shortcuts
 - Print page
Are there any keyboard shortcuts
| Keyboard shortcuts The editor provides the following key combinations: |
|
|---|---|
| ENTER | new paragraph(<P>) |
| SHIFT-ENTER | insert linebreak(<BR>) |
| CTRL-A | Select all |
| CTRL-B | Bold |
| CTRL-I | Italic |
| CTRL-U | Underline |
| CTRL-S | Strikethrough |
| CTRL-L | Justify Left |
| CTRL-E | Justify Center |
| CTRL-R | Justify Right |
| CTRL-J | Justify Full |
| CTRL-Z | Undoes your last action |
| CTRL-Y | Redoes your last action |
| CTRL-N | Set format to paragraph |
| CTRL-1 .. CTRL-6 | Headings (<h1> .. <h6>) |
| CTRL-X | Cut selection |
| CTRL-C | Copy selection |
| CTRL-V | Paste from clipboard |
For you Mac users out there, to insert a line break <BR> press control+return.
How do I create a link?
*Please note using this method to add images will not display the images in the page. You will only create a link for someone to navigate to. Please see "How do I add an image?" below on how to add an image.
There are two types of links: external and internal.
External
a link to a website, document, image that is hosted outside of your site (i.e., http://www.cnn.com, https://www.ctsacentral.org or https://www.ctsacentral.org/sites/default/files/imagecache/home_promo/Dr.%20Gahl%20in%20lab.jpg)
- Highlight the text that you would like to create a link to.
- Click on the image for "Insert a Web Link."
- In addition, you can rightclick on your mouse to open additional options
- Click on "Make link. . ." to open link options.
- Please note that there is a css conflict that makes the images here makes the images disappear. The functionality still works. We are looking into correcting this.
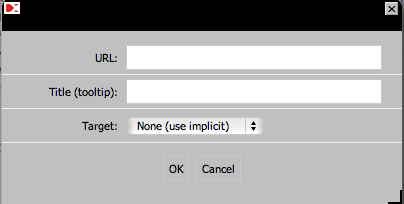
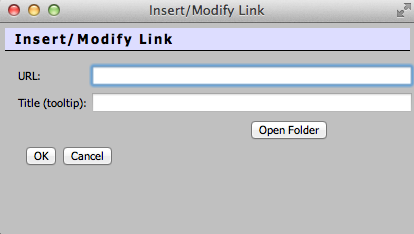
- Type in the entire website address (including http:// or https://) into the field labeled "URL:"
- Add a few words to describe what the link is for in the field labeled "Title (tooltip)." This will give some additional text to a user when they hover over the link with their mouse and give additional information to website crawlers such as google as to the nature of the link.
- Choose how you want the users browser to open the link using the dropdown menu labeled "Target:"
- (Default) "None (use implicit):" link will open in the same window replacing the previous contents. Users will have to use the back button to return to the page that they were on prior to clicking on your link.
- (Preferred) "New window (_blank):" link will open in a brand new browser window.
- (not used) "Same frame (_self):" same as "None (use implicit)" (depreciated as we do not use frames for website design).
- (not used) "Top frame (_top):" same as above.
- (not used) "Other" allows you to enter another attribute.
- Click on "OK."
Internal
a link to a page, document or image hosted by your site. (i.e., /pages/about, /pages/contact, /site/files/view/logo.jpg)
- Click on the link to Insert Internal Link
- Please note do not highlight text that you would like to hyperlink as this tool will replace the text with what you input in the Title (tooltip): field.
- There are two types of internal links that you can add: pages (internal web pages) and documents These instructions are only for pages. The next faq discusses how to add a document or image,
- Type in the internal path to the page you would like to link to.
- If the page is in your program area, then you only need to type in the name of the page. For example, if I am updating the about program area and I want to link to this manual, then all I would have to do is type the following: manual.
- If the page is in a different program area, then you need to type in the directory name as well. For example, I want to link to a page in education titled award, I would input the following: /education/pages/award.
- Input what you want your link to be titled under the field labeled Title (tooltip):
- Press Ok to add the link.
How do I upload a document or image?
*Please note that Firefox is the only browser that does not support this feature.
Upload an image or document by using the Insert Internal Link  or Insert Image
  link.
link.
- Click on open folder.
or
- Navigate to the appropriate folder. Documents are uploaded to the folder named docs and Images are uploaded to the folder named images.
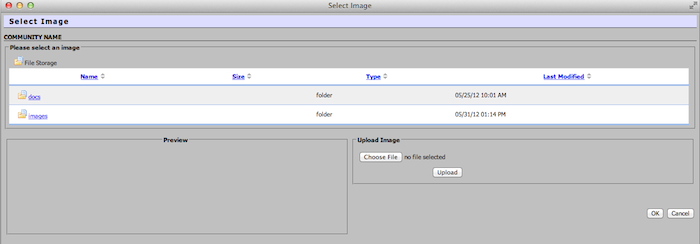
- Click on Choose File. This will open up a window to allow you to add a file from your computer.
- Once you locate the file, click on it and click on Choose.
- Click on Upload.
- The file is now uploaded to the folder. You can either click on Cancel to return to the editor or continue to add your document or image to the page.
How do I add an image?
*Please note that Firefox is the only browser that does not support this feature.
Is the image you want to add already in storage? If not, then you need to upload the file (Please see "How do I upload a document or image?" above).
Once the file is uploaded into file storage (size limit of <100mb), do the following.
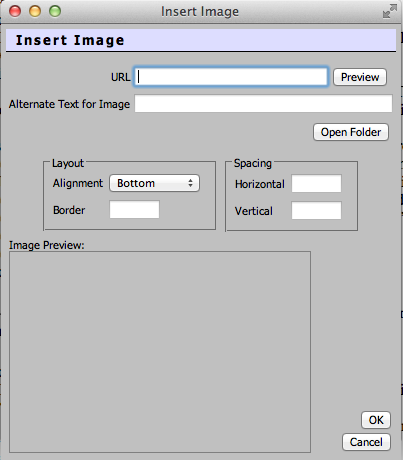
- Click on the link to Insert Image
- Click on the link labeled Open Folder.
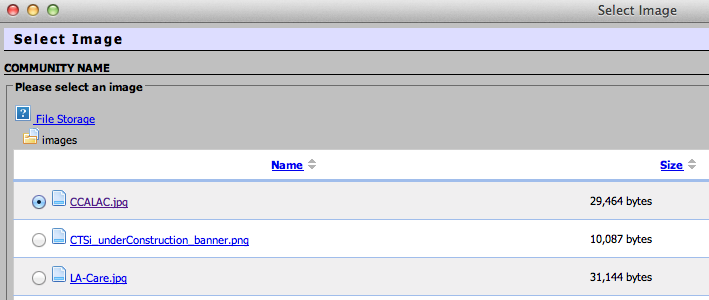
- Locate the file in the images folder.
- Select the file you want to link to.
- Click on OK.
- Provide additional text to describe the image for web crawlers and the sight impaired.
- Click on OK to add the image.
If you need to change the properties!
- Highlight the image.
- Click on the link to Insert Image
- The right click image properties feature does not work.
- Modify the attributes in pixels. For example if I want 5px space on the top and bottom of the image with 10px spacing on the sides then I would input 5 & 10 in the fields for spacing. If I wanted a border, I could add a 2px border by inputting 2 in the field for border.
- Click OK to finalize the modification.
How do I add a document?
Is the document you want to add already in storage? If not, then you need to upload the file (Please see "How do I upload a document or image?" above).
Once the file is uploaded into file storage (size limit of <100mb), do the following.
- Click on the image to Insert Internal Link
- Click on the link labeled Open Folder.
- Locate the file in either the docs or images folder.

- Select the file you want to link to.
- Click on Ok.
- Change the name of the link by updating the information inputted in the Title (tooltip):
- Click on Ok to add the link.
I broke the page! How do I revert to the previous version?
Click on the button that says "Revisions"
This page will list all the versions that were published. Your most recent changes will be listed at the top.
Use the radial selection under the column labeled "Live Revision" to select the version of the page that was still working.
Contact pbabin@mednet.ucla.edu for additional assistance updating the page.
How do I use the revision system?
1. After submitting an edit, you can view the previous versions of a page by clicking on the button/link labeled Revisions.
2. All previously published versions of the page will be displayed on this page.
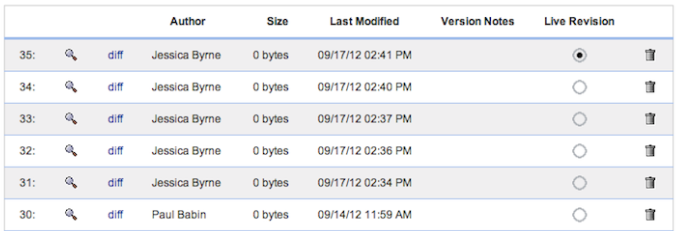
3. The magnifying glass shows what the page will look like if that particular version is selected to be live.
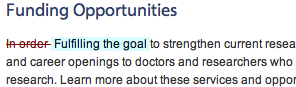
4. Clicking on the link labeled diff will show the differences between the version displayed and the one previous. A red strike-through represents a deletion. A blue-highlight represents additions.

5. The column labeled Live Revision shows which version is currently being displayed on the website. You can revert to a previous revision by selecting the radial of any previous version.

6. The trashcan  allows you to delete any version submitted. We highly recommend that you do not use this feature! By deleting a version, the version is no longer available for a user to return to.
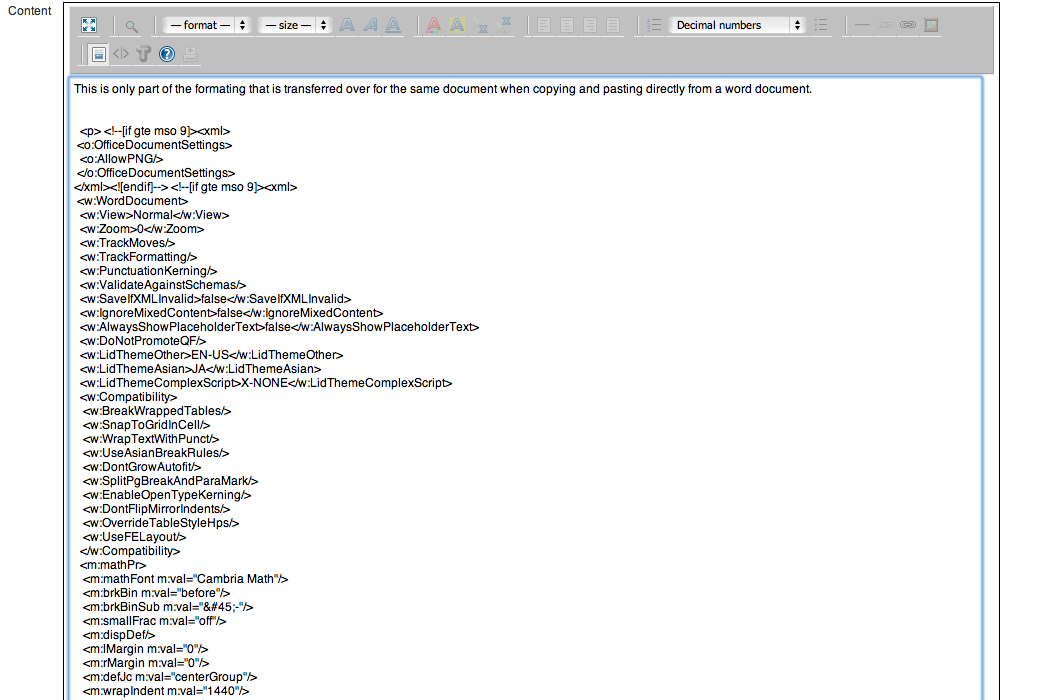
Why doesn't my page look like it did in Word (or another rich text editor)?
Copying and Pasting text please do not directly copy and paste text from other wysiwyg editors the editor will retain the custom formatting from the copy which will result in errors with the display of the text. If you do copy and paste from word, please click on the yellow broom in the left hand corner to remove much of the stylization and extra hidden characters.
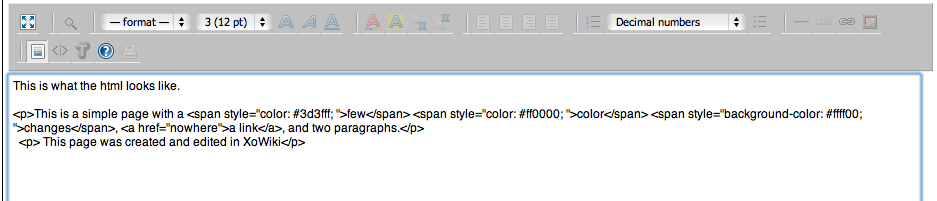
Example
Display of page in the editor

Html of page edited in the editor
Display of page created and copied from Word
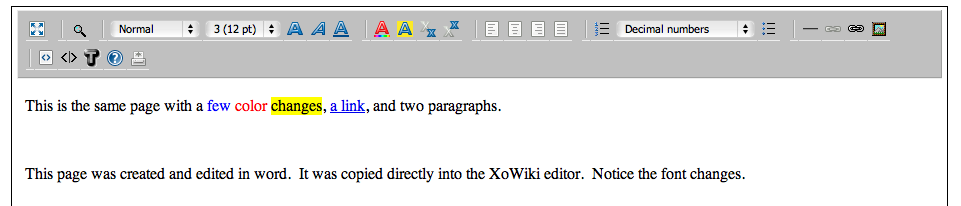
Html of page created and copied from Word
Who can I contact if I have questions?
You can contact our support desk.
evaluation of adp file returned error message: No script or template found for page '/web/open-cms/packages/xowiki/lib/collapse'

